Are you looking to unlock the power of remote control for your Internet of Things (IoT) devices, all while keeping your wallet happy? The answer lies in SSH on your Mac, and it's completely free! In this era of interconnected devices, where IoT is rapidly transforming our homes, workplaces, and cities, mastering remote access via SSH is no longer a luxury, but a necessity for both enthusiasts and seasoned professionals. This guide is meticulously crafted to walk you, step-by-step, through the process, ensuring you can establish secure connections to your IoT devices right from your Mac.
SSH, or Secure Shell, is a cryptographic network protocol, providing a secure and encrypted channel for communication over an unsecured network. It enables users to securely access and manage remote devices, making it an indispensable tool in modern IT environments, especially within the dynamic realm of IoT. From the novice tinkerer to the experienced system administrator, this article serves as your comprehensive resource, providing all the essential information needed to set up SSH remote access for your IoT devices on your Mac, without incurring any cost.
By the conclusion of this guide, you'll possess a clear and practical understanding of the tools, configurations, and best practices essential for effectively leveraging SSH. Join us as we delve into the intricacies and explore how you can harness the power of SSH for efficient and secure remote IoT management.
- Al Weavers Spouse Unveiling Their Life Impact
- Movie Rulzcom Kannada Kannada Cinema Exploring Trends Mustwatch Films
Table of Contents
- Introduction to SSH
- Why Use SSH for IoT?
- Prerequisites
- Setting Up an SSH Server
- Connecting to Your IoT Device
- Securing Your SSH Connection
- Troubleshooting Common Issues
- Advanced Features
- Cost-Effective Options
- Conclusion
Introduction to SSH
Secure Shell, or SSH, stands as a cornerstone of secure network communication, built upon the foundations of cryptographic principles. Its primary function is to provide a secure channel for data transmission over networks that might otherwise be considered insecure. This is achieved through encryption, safeguarding sensitive information from interception and unauthorized access. In essence, SSH creates a secure tunnel, allowing users to remotely manage and control devices with confidence, irrespective of the underlying network's security posture. This makes SSH especially relevant in IT infrastructure, and particularly in the expanding landscapes of the Internet of Things, offering robust security that is critical.
Key Features of SSH:
- Encryption for data in transit: Ensuring confidentiality and preventing eavesdropping.
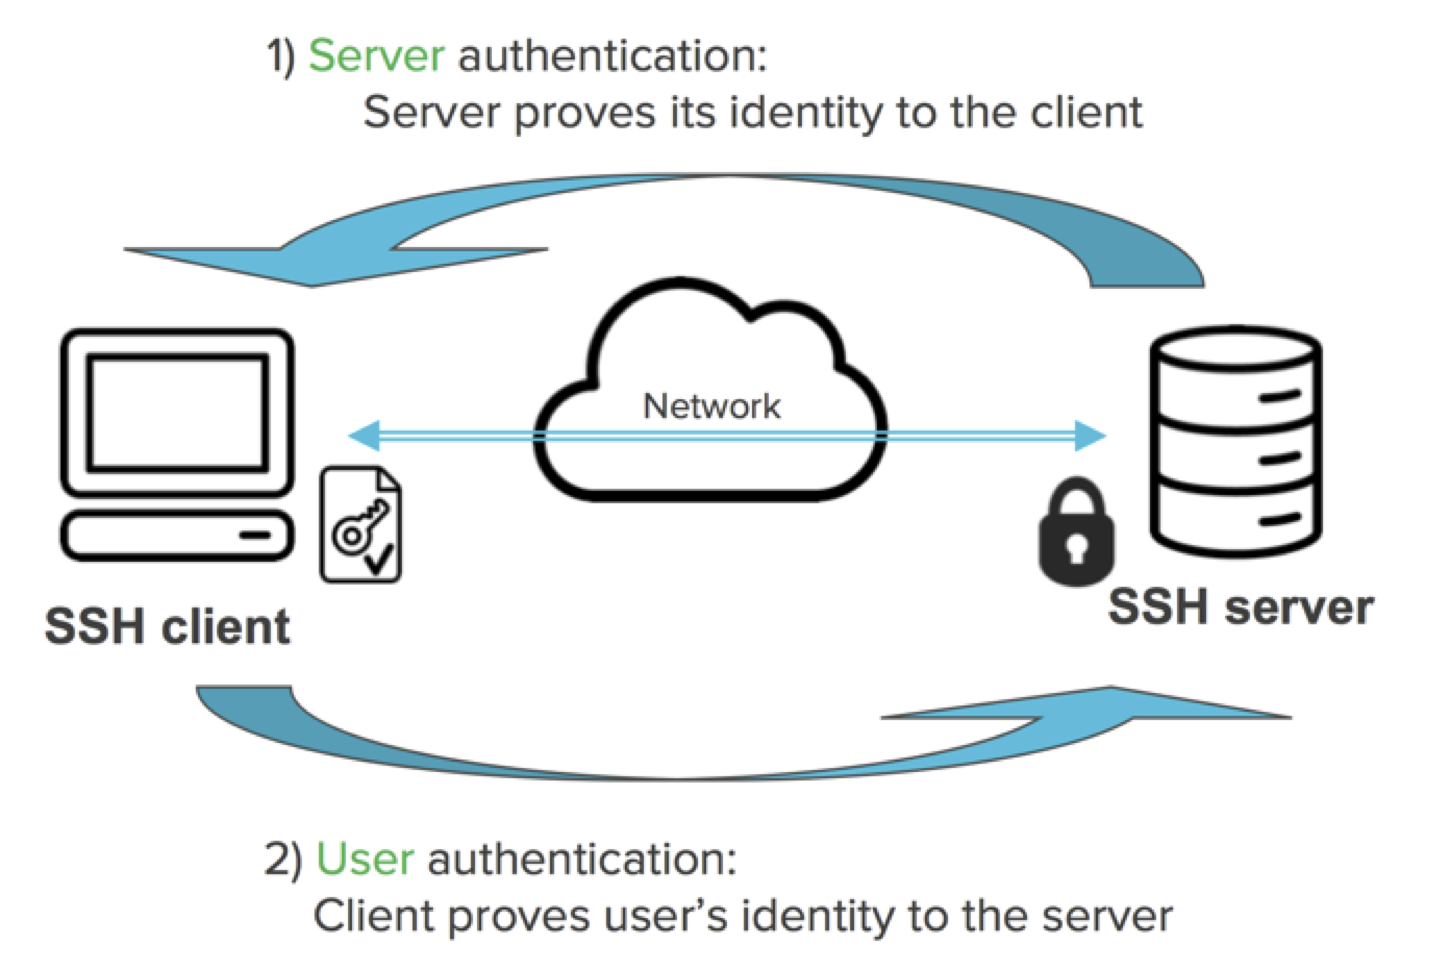
- Authentication mechanisms to verify user identity: Guaranteeing that only authorized users can access the system.
- Support for various commands and file transfers: Providing a versatile tool for remote system administration.
A solid understanding of SSH is paramount for anyone seeking to manage IoT devices remotely, especially when operating on a Mac platform. This introductory section lays the groundwork, providing the necessary context and fundamental knowledge for the remainder of this comprehensive guide.
- Woodman Casting 2025 Auditions Trends Amp Tips
- Movirulz Kannada Your Guide To Kannada Movies Entertainment
Why Use SSH for IoT?
The deployment of IoT devices often occurs in remote and geographically dispersed locations, making physical access a challenge, if not entirely impractical. In this scenario, SSH emerges as a robust and reliable solution, offering a secure pathway for remote management. By leveraging SSH, you can:
- Establish secure connections to your IoT devices from virtually anywhere in the world.
- Execute commands and scripts, automating routine tasks and streamlining workflows.
- Transfer files seamlessly between your Mac and your IoT devices, enabling efficient data management and updates.
Beyond the convenience of remote access, SSH provides robust security, safeguarding your data during transmission, thereby significantly reducing the risk of unauthorized access and potential security breaches. This makes it an ideal protocol for IoT applications, where the security and integrity of data are of paramount importance.
Advantages of SSH Over Other Protocols
When compared to alternative remote access protocols, SSH presents several distinct advantages, making it a preferred choice in many scenarios:
- Strong encryption: SSH employs robust encryption algorithms to ensure secure communication, protecting sensitive data from interception.
- Support for public key authentication: This feature adds an extra layer of security, making it significantly harder for unauthorized individuals to gain access.
- Compatibility: SSH is widely compatible, working seamlessly across a broad spectrum of devices and operating systems.
Prerequisites
Before embarking on the journey of setting up SSH for your IoT devices, it's crucial to ensure you have the following essential components in place:
- A Mac computer equipped with macOS installed and running smoothly.
- An IoT device that possesses the capability to act as an SSH server.
- A stable and reliable internet connection to facilitate communication.
- A foundational understanding of terminal commands, which will be essential for interacting with the system.
TIP: If you are unfamiliar with terminal commands, don't let it discourage you! This guide is designed to be user-friendly, and we will carefully guide you through each step, ensuring you can follow along with ease and confidence.
Setting Up an SSH Server
To effectively utilize SSH, you must first establish an SSH server on your chosen IoT device. The majority of modern IoT devices come equipped with SSH server capabilities as a standard feature, however, it is important to note that this functionality may need to be enabled manually via the device's settings.
Steps to Enable SSH on Your IoT Device
1. Access the IoT Device: Begin by connecting to your IoT device using its default interface. This may involve using a web UI (user interface) accessed via a web browser, or a command-line interface (CLI) for more direct control.
2. Locate the SSH Settings: Once connected to the device, navigate through the settings menu or configuration options. The specific location of these settings will vary depending on the device's operating system and manufacturer, but typically, you will find an option related to SSH.
3. Enable SSH: Within the SSH settings, locate the option to enable the SSH server. Toggle this setting "on," to activate the server. Crucially, make a note of the IP address of your IoT device. This IP address is essential for establishing remote connections from your Mac.
With the SSH server now successfully enabled, your IoT device is prepared to accept incoming remote connections from your Mac.
Connecting to Your IoT Device
With the SSH server up and actively running on your IoT device, it's now time to initiate the connection from your Mac. This involves a series of straightforward steps.
Step-by-Step Guide
1. Open Terminal: Begin by launching the Terminal application on your Mac. You can locate Terminal in the "Utilities" folder within your "Applications" folder, or you can use Spotlight search by pressing Command + Space and typing "Terminal."
2. Enter the SSH Command: Within the Terminal window, type the following command, replacing "username" and "IP_address" with the specific details of your IoT device. The "username" should correspond to the user account you wish to use to access the device, and "IP_address" represents the network address of your IoT device:
ssh username@IP_address
For example: ssh john.doe@192.168.1.100
3. Authenticate: After entering the SSH command, you will be prompted to authenticate. You will be required to enter your password, or, if you have configured it, you can use public key authentication to streamline the process. Upon successful authentication, you should be granted a secure connection to your IoT device, allowing you to execute commands and manage the device remotely through the Terminal.
Securing Your SSH Connection
Security is paramount when utilizing SSH for remote access to your IoT devices. It's important to implement robust security measures to protect your devices from potential vulnerabilities and unauthorized access. Here are some recommended best practices to enhance the security of your SSH connections:
- Implement strong passwords: Create complex and unique passwords that are difficult for attackers to guess. Consider using a password manager to generate and store strong passwords securely.
- Implement public key authentication: Public key authentication eliminates the need for passwords, significantly enhancing security.
- Disable root login: Root login should be disabled to prevent unauthorized access.
- Change the default SSH port: Changing the default SSH port (port 22) to a non-standard port can help to reduce the risk of automated attacks.
By rigorously implementing these security measures, you can dramatically reduce the risk of unauthorized access to your IoT devices, ensuring the integrity and confidentiality of your data.
Public Key Authentication
Public key authentication is a secure and preferred method for authenticating SSH connections, as it eliminates the need to enter passwords, which can be vulnerable to theft or compromise. Heres a step-by-step guide to setting up public key authentication:
1. Generate Key Pair: Use the following command in your Terminal to generate a new key pair:
ssh-keygen
During the key generation process, you will be prompted to specify the file where you wish to save the key pair, and you will be asked to create a passphrase. It is highly recommended to protect your private key with a strong passphrase. This passphrase will be required whenever you attempt to use the key for authentication.
2. Copy Public Key: Following the key generation, you will need to copy the public key to your IoT device. Use the following command, replacing "username" and "IP_address" with your IoT devices credentials:
ssh-copy-id username@IP_address
This command will securely copy your public key to the authorized_keys file on your IoT device.
3. Test Connection: After copying your public key, you should be able to connect to your IoT device without entering your password. Try connecting with the following command, replacing "username" and "IP_address" with your IoT device's details:
ssh username@IP_address
Troubleshooting Common Issues
Even with careful configuration and setup, its not uncommon to encounter issues when working with SSH. Here are some of the common problems, along with their respective solutions, to help you resolve any difficulties:
- Connection Refused: If you encounter a "connection refused" error, it typically means the SSH server is not running on your IoT device, or the IP address you are using is incorrect. Double-check that the SSH server is enabled and that you are using the correct IP address. You can also ensure that no firewall is blocking the connection.
- Authentication Failed: An "authentication failed" error points to an issue with your login credentials. Double-check that you have entered the correct username and password. If you are using public key authentication, confirm that the public key has been correctly copied to your IoT device and that the necessary permissions are in place.
- Timeout Errors: Timeout errors usually indicate a problem with your network connection or firewall settings. Verify that your Mac and your IoT device have a stable internet connection, and check your firewall settings to ensure SSH traffic is not being blocked.
If you encounter any issues that are not covered in this section, please consult the extensive online resources available or reach out to the online communities specializing in SSH and IoT devices. They often provide very helpful guidance for troubleshooting.
Advanced Features
Once you have become comfortable with the basic operations of SSH, you can explore the range of advanced features to significantly enhance your workflow and productivity when managing your IoT devices. Some key advanced features to consider include:
- SSH Tunnels: SSH tunnels can be used to create secure tunnels for transferring data between your Mac and your IoT devices, adding an extra layer of security to your data. This can also be used to access services or applications running on your IoT devices.
- SSH Config File: A well-configured SSH config file will simplify the management of your SSH connections by storing your connection settings, such as usernames, hostnames, and port numbers, making it easier to establish connections to multiple devices.
- Automated Scripts: With the help of SSH, you can automate a range of repetitive tasks on your IoT devices. You can create scripts to execute commands, transfer files, and perform system updates with a single command.
These advanced features are designed to save you time, increase efficiency, and provide greater control over your IoT management processes.
Cost-Effective Options
Employing SSH for remote access to your IoT devices is inherently a cost-effective solution, particularly when contrasted with proprietary software or commercial hardware-based solutions. By utilizing SSH, you can benefit from the following financial advantages:
- Avoid Subscription Fees: By using open-source tools and protocols like SSH, you completely eliminate the need to pay for costly subscription fees, providing significant cost savings.
- Minimize Hardware Costs: The core of SSH relies on existing hardware such as your Mac and IoT devices. Theres no need to purchase expensive proprietary hardware.
- Scalable: As your IoT ecosystem expands, the cost of using SSH doesnt increase, making it scalable without incurring additional expenses.
By choosing SSH, you can achieve professional-grade remote access capabilities without straining your budget.
- Movierulz Kannada 2023 Is It Safe Legal Alternatives
- Salaar Movierulz 2024 Download Risks Legal Alternatives