Can you truly command your Raspberry Pi from any corner of the globe? The answer, without reservation, is a resounding affirmative. By harnessing the power of Secure Shell (SSH), you can transform your compact computing device into a globally accessible gateway, but it demands a meticulous approach to safeguard against unwanted intrusions.
In an age dominated by the seamless flow of information, the ability to remotely interact with your technological assets is no longer a luxury; it is, without a doubt, a necessity. Whether you find yourself immersed in the world of development, fueled by a relentless curiosity, or navigating the complexities of IT as a seasoned professional, the capability to remotely access your Raspberry Pi offers a level of convenience and efficiency that is unmatched. This comprehensive guide is crafted to offer a detailed roadmap, providing the essential knowledge and actionable steps to configure secure remote access via SSH, ensuring a connection that is as robust and secure as it can possibly be.
Our goal is to furnish you with a comprehensive, step-by-step guide that demystifies the often-complex process of establishing remote SSH access to your Raspberry Pi over the Internet. From initial configurations to the implementation of advanced security measures, we will delve into every aspect of this procedure. The objective is to equip you with the skills and understanding required to create a stable and secure connection. Let's begin.
- Hdhub4u 2025 Your Ultimate Streaming Guide Review
- Kash Patels Eye Injury What Happened Why It Matters
Here is a table of contents for easy navigation:
- Introduction to SSH
- Raspberry Pi Overview
- Enabling SSH on Raspberry Pi
- Securing Your SSH Connection
- Configuring Port Forwarding
- Using Dynamic DNS
- Alternative Remote Access Methods
- Troubleshooting Common Issues
- Best Practices for Remote SSH
- Conclusion and Next Steps
Introduction to SSH
Secure Shell, or SSH, stands as a fundamental cryptographic network protocol, painstakingly designed to facilitate secure communication between devices across networks that may not be inherently secure. Its applications are extensive, including remote command-line login and execution, efficient file transfer, and robust tunneling capabilities. SSH is not simply a tool; it is a guardian, ensuring data integrity, preserving confidentiality, and meticulously managing authentication. For those seeking secure remote access, SSH is the definitive method.
For Raspberry Pi users, SSH provides the key to remotely control their devices without the need for physical presence. This becomes especially valuable in headless setups, where the Raspberry Pi operates without the visual aids of a monitor or the physical input of a keyboard. By simply enabling SSH on your Raspberry Pi, you gain the power to manage files, install software, and execute administrative tasks from anywhere in the world.
- Remote Iot Batch Jobs On Aws Examples Best Practices
- Dana Perinos Husband Is Ed Gillespie Unwell Facts Insights
Why Use SSH for Raspberry Pi?
- Security: SSH employs strong encryption for all data transferred between your device and the Raspberry Pi, effectively shielding against eavesdropping and unauthorized access.
- Convenience: SSH frees you from the limitations of physical access, enabling remote management of your Raspberry Pi with unmatched ease.
- Flexibility: SSH offers a vast array of commands and tools, enabling you to accomplish complex tasks with remarkable simplicity.
Raspberry Pi Overview
The Raspberry Pi, a compact feat of engineering, is a single-board computer, roughly the size of a credit card, conceived by the minds at the Raspberry Pi Foundation. It has rapidly gained popularity among hobbyists, educators, and professionals alike, celebrated for its affordability, versatility, and user-friendly design. Equipped with a capable processor, a suite of GPIO pins, and an array of connectivity options, the Raspberry Pi excels in a wide range of applications, from home automation to the exciting field of robotics.
One of the most defining characteristics of the Raspberry Pi is its impressive ability to run a diverse selection of operating systems. These include the widely used Raspbian (now known as Raspberry Pi OS), Ubuntu, and many others. This adaptability allows users to meticulously tailor their setups to meet their specific requirements, making it an ideal platform for experimentation and rapid development.
Raspberry Pi Specifications
- Processor: Broadcom BCM2835 or later
- Memory: Varies from 512MB to 8GB, depending on the specific model
- Connectivity: Ethernet, Wi-Fi, Bluetooth
- Storage: MicroSD card
Enabling SSH on Raspberry Pi
Before you embark on the journey of remote connectivity for your Raspberry Pi via the Internet, the first step is to ensure that SSH is enabled on the device. Fortunately, this process is straightforward and can be managed through either the graphical interface or the command line.
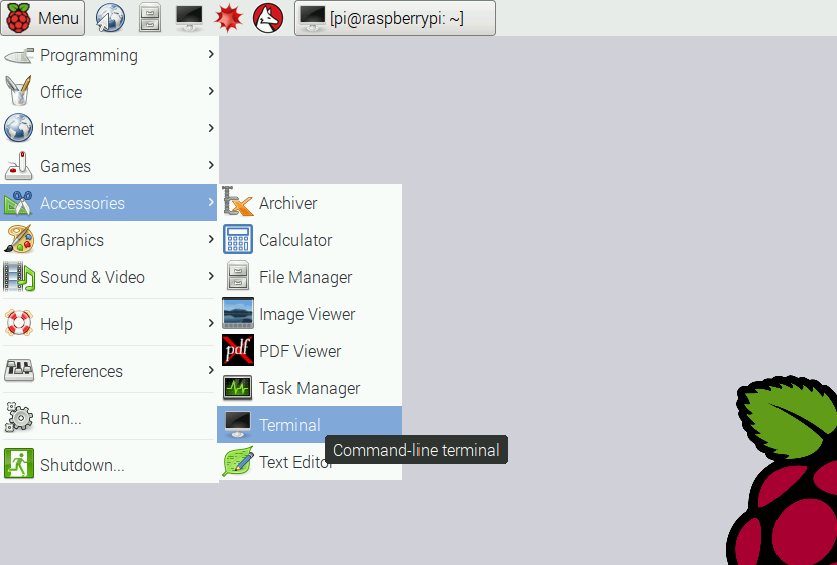
Method 1
- Access the Raspberry Pi Configuration tool via the Preferences menu.
- Navigate to the "Interfaces" tab.
- Locate "SSH" and select "Enabled."
- Restart your Raspberry Pi to solidify the changes.
Method 2
For those working in a headless setup, enabling SSH can be accomplished using the command line through the terminal. Execute the following command:
sudo systemctl enable ssh
This ensures that SSH automatically starts during the boot sequence of your Raspberry Pi. You can also manually start the SSH service using the following:
sudo systemctl start ssh
Securing Your SSH Connection
Security takes center stage when setting up remote SSH access to your Raspberry Pi over the internet. Without taking the proper security precautions, your device could be vulnerable to unauthorized access. Here is a detailed guide to fortifying your SSH connection:
1. Change the Default SSH Port
By default, SSH operates on port 22. Changing this to a non-standard port can deter automated attacks. To accomplish this, you will need to edit the SSH configuration file:
sudo nano /etc/ssh/sshd_config
Locate the line that reads "Port 22" and substitute it with your desired port number. Save the file and then restart the SSH service:
sudo systemctl restart ssh
2. Disable Root Login
Allowing root login through SSH represents a significant security risk. To neutralize this, you need to edit the SSH configuration file and set the "PermitRootLogin" option to "no." Remember to restart the SSH service after this change.
3. Use Public Key Authentication
Public key authentication presents a more secure alternative to password-based authentication. To start this process, you will generate a key pair on your local machine:
ssh-keygen -t rsa -b 4096
Next, transfer the public key to your Raspberry Pi:
ssh-copy-id pi@your_raspberry_pi_ip
Configuring Port Forwarding
To allow access to your Raspberry Pi over the internet, the configuration of port forwarding on your router is crucial. The exact steps can vary based on your router's model, but the general process is as follows:
- Access your router's web interface via a web browser.
- Navigate to the settings dedicated to port forwarding.
- Create a new rule, specifying the internal IP address of your Raspberry Pi and the SSH port (which, by default, is port 22).
- Save the modifications and then test the connection to confirm functionality.
Using Dynamic DNS
Most home internet connections are assigned dynamic IP addresses, meaning these addresses change periodically. To maintain a consistent connection, it's wise to use a Dynamic DNS (DDNS) service. DDNS maps a domain name to your ever-changing IP address, allowing you to access your Raspberry Pi through a consistent URL.
Popular DDNS Providers
- No-IP
- Dynu
- duckdns.org
Register with a DDNS provider and configure it either on your router or directly on your Raspberry Pi. This guarantees that your chosen domain name always points to your current IP address.
Alternative Remote Access Methods
While SSH is the primary method for remote access, other tools are available to suit your unique needs and preferences.
1. VNC (Virtual Network Computing)
VNC gives you the ability to remotely access the graphical desktop environment of your Raspberry Pi. This is particularly helpful for tasks that need a visual interface.
2. Web-Based Interfaces
Certain applications, such as Home Assistant, offer web-based interfaces that can be accessed through a standard web browser. This eliminates the need for SSH or VNC entirely.
Troubleshooting Common Issues
Even with careful planning and execution, challenges may arise when setting up remote SSH access to your Raspberry Pi over the internet. Here's a breakdown of frequently encountered issues and their solutions:
1. Connection Timeout
If you can't connect to your Raspberry Pi, double-check the following:
- That SSH is correctly enabled on your Raspberry Pi.
- That port forwarding is accurately configured on your router.
- That your firewall isn't blocking the SSH port.
2. Permission Denied (Public Key)
This error usually occurs when public key authentication is misconfigured. Always carefully verify that your public key is accurately added to the authorized_keys file on your Raspberry Pi.
Best Practices for Remote SSH
For a smooth and secure experience, follow these best practices:
- Ensure you regularly update your Raspberry Pi's software to patch security vulnerabilities.
- Use strong, unique passwords for all user accounts.
- Monitor your SSH logs for any suspicious activity.
- If possible, restrict SSH access to trusted IP addresses.
- 5movierulz Kannada 2024 Is It Safe Alternatives Risks Explained
- Movierulzcom What You Must Know Before You Download